The Problem With Inside Curves (Part 2)
Linda Landy
This is part two of the instructions for the Bugle Bezel. As you may recall, not all shapes can be bezeled using traditional methods -- especially anything with an inside curve. When you begin to tighten your bezel around a cabochon with an inside curve, the bezel wall on the inside curve will tighten up as if that side was straight, leaving a gap between the bezel and the cab. You can overcome the issue with inside curves by creating a bugle bezel. See last weeks instructions for a ring ladder.
We will start with the bugle bead ladder we learned about last week. Remember, I should fit completely around the cab when laid on its side and is constructed of an even number of bugle beads.
Affix the cabochons to your foundation using Terrifically Tacky Tape of E6000. Fit the ladder ring onto your cab. To secure the ring to the foundation, knot your thread and bring it up through the foundation position your needle so that the thread is exiting a bugle at the top of the cab.
Pick up an 11/0 seed bead and pass down through the adjacent bugle and through the foundation. Pass up through the foundation and the next bugle

Repeat until you have passed completely around the cab.

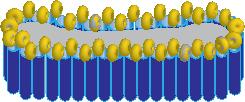
Position your needle so that it is exiting an 11/0 bead at the top of the first bugle. Using the 11/0 beads at the top of the bugles, complete a round of peyote with 11/0 beads.

Step up and complete two rounds of peyote using a 15/0 seed bead. Your cab should now be encased in the bugle bead bezel. If it is not secure, add an additional round or two of peyote stitch using a 15/0 Charlotte. Work your thread down through the foundation, knot and trim.