contact us

Use the form on the right to contact us.

You can edit the text in this area, and change where the contact form on the right submits to, by entering edit mode using the modes on the bottom right.


123 Street Avenue, City Town, 99999

(123) 555-6789

email@address.com


You can set your address, phone number, email and site description in the settings tab.
Link to read me page with more information.

BKS-67021-SAKURA-8.JPG

Textured Bead Blog

Take your beading to the next level with bead artist Linda Landy posts regularly about the techniques you need to create bead-embroidered works that are sculptural, three-dimensional, and very textured. Keep up with trends and new products in bead embroidery and bead weaving. 


Seed Bead Manufacturers Variations

Linda Landy

Beads vary dramatically between manufacturers. They are generally divided into Japanese Seed Beads, Japanese Cylinder Beads, Czech Seed Beads and Others. Bead selection makes a tremendous difference in the finished work.

samples scan 3.jpg

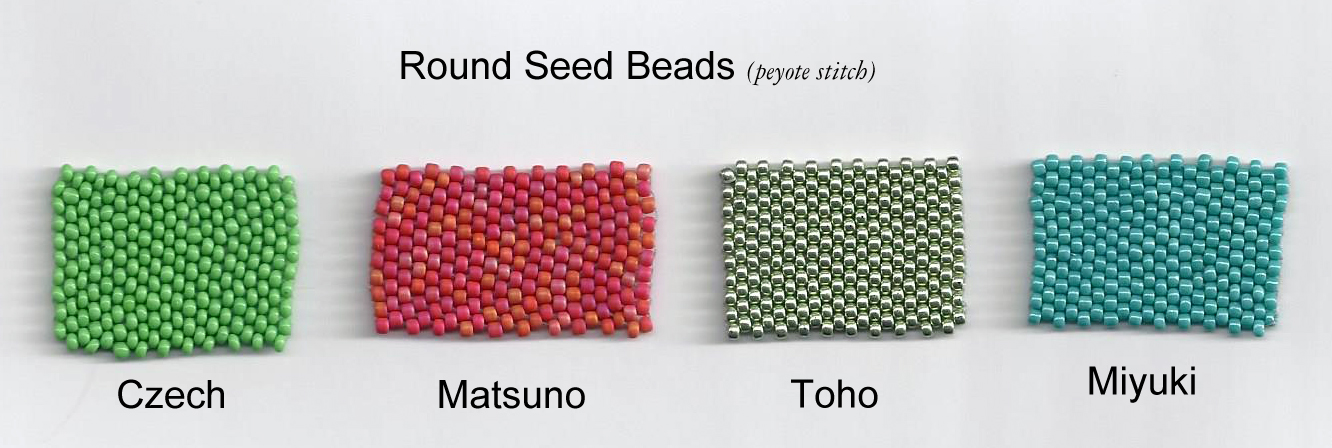
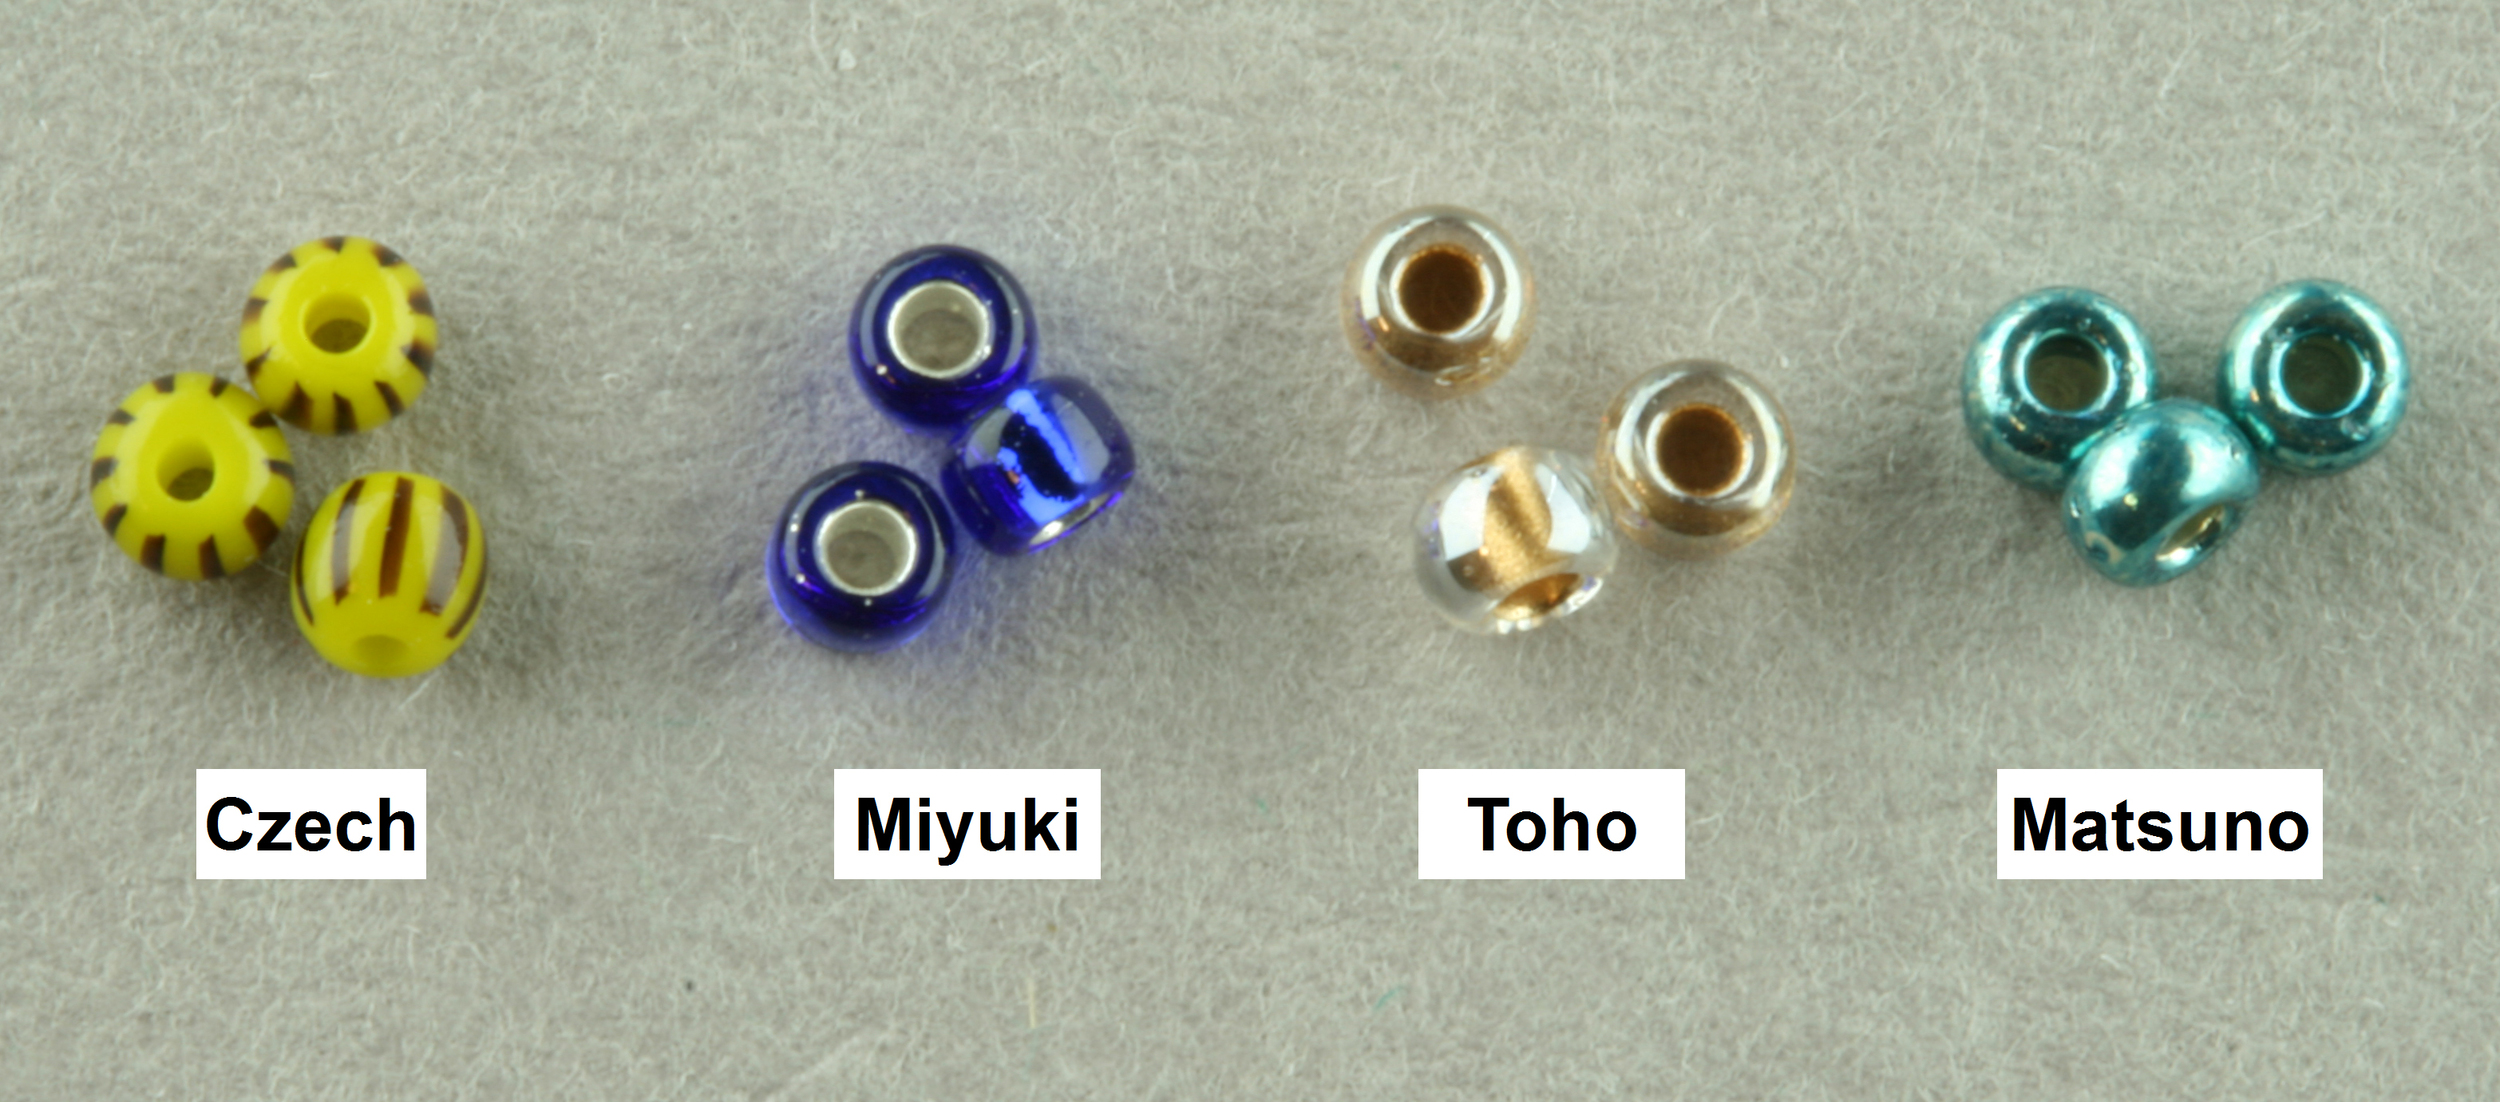
Japanese Seed Beads: The Japanese are known for producing the finest quality seed beads because they are the most uniform. There are three major factories in Japan that produce seed beads: Miyuki, Toho and Matsuno. Miyuki & Toho beads are a bit more rounded, with large holes. Matsuno beads tend to be taller (hole to hole) than they are around which makes them look a bit cylindrical.

Seed bead variations 6.jpg

Japanese Cylinder Beads: Japanese Cylinder Beads are considered the Cadillac of seed beads. Miyuki’s cylinder bead,  known as a Delica bead, is tube shaped and extremely consistent in size without the rounded, bulging sides common to seed beads. When woven they fit together beautifully. Delicas, generally more expensive than seed beads, are typically sold in smaller amounts. Many beaders prefer Delicas because they have large holes for their size (which accommodates multiple passes of thread), they require little culling, and they come in a huge variety of colors. A finished project using Delicas would weigh less than a comparable seed bead project, since the walls of the Delicas are very thin. Remember: Miyuki manufactures beads, seed beads and Delicas. All Delicas are made by Miyuki, but not all beads from Miyuki are Delicas.

Delicas are a different shape and substantially smaller than the same “size” seed beads. Delicas create an even, tiled-looking surface. Woven seed beads are less even and far bumpier. If you work a project graphed for Delicas in traditional seed beads (or vice versa) the design might work, but it would be somewhat distorted, since seed beads are proportioned differently.

To confuse matters further, there are other brands of cylinder beads. "Treasures" by Toho beads can be substituted for Delicas; however, they use different color numbering systems. Toho "Treasures" used to be called "Antiques," but the name was changed to minimize confusion, since the beads are not antique. The Toho Cylinder Bead is called "Aiko beads." Designed especially for bead weaving, Aiko beads are exceptionally consistent in shape and size, creating a woven piece with an extremely smooth finish. Available in more than 1000 colors, Aiko cylinders are approximately 10½/o — they are larger than 11/o but smaller than a 10/o. Because of their larger size, they will NOT work with Delicas or Treasures in a symmetrical project. They can be intermingled for a textured effect.  Aikos require little or no culling of the beads. The rounded edges will not cut threads in right angle weaving. They are slightly more expensive than Delicas/Treasures, but there are few unusable beads to throw away.

I rarely use cylinder beads for backstitching in bead embroidery. They do not mesh well together when lined up end to end, and if your line curves you will probably see gaps between your beads. Further, they are not as effective as round seed beads or Charlottes (see below) as stop beads. I find that because of their straight sides, they do not nestle into the bigger bead and more thread is visible. The cylinder bead is usually my first choice in bezels, bails, toggles and closures.

Czech Seed Beads: The next most popular seed bead is from the Czech Republic. Czech seed beads are shaped like donuts with rounded edges and small holes. They are usually sold in a hank (12 looped strands of beads tied together at the ends). Their tendency to be irregular in shape and small hole makes them a poor choice for bead weaving, but Czech beads have their place in bead embroidery if you have the patience to cull them. I especially like to use them as stop beads as they nestle into the primary bead very well.

Heavy Metal or Metal beads are a brass based heavily plated metal beads in a variety of finishes.  Very uniform in size with large holes, they are more rounded than Japanese glass beads. The edges of the holes may be sharp and can cut through beading thread. Use Fireline thread and avoid pulling or scraping the thread against the edge of the hole. These are also among my bead embroidery favorites. I like the shape of the bead, and their color and shine make a strong statement.

Seed bead variations 8.jpg

Other Seed Beads: Seed beads are also made in other countries (Italy, Taiwan, India, Hong Kong). They are not recommended for bead weaving.


Here again are the links to the major bead manufacturer's information pages:

Toho Beads

Miyuki Beads

Matsuno Beads

Preciosa Beads

Enter your email address to subscribe to the Extreme Bead Blog. Be sure to verify when you get the email.:

Delivered by FeedBurner

Inspiration

Linda Landy

I can't tell you how many times I was asked what inspired me to do one of my creations. I usually laugh. While I always strive to create something that is a little whimsical and a lot outside the box, every project has a different inspiration.

Most were inspired by cabochons or beads that “spoke to me.” I know it sounds a little unusual, but I often pick up a bead or component and immediately know what I want to do with it. I don’t know where the ideas come from. I just follow their lead.

One of the projects in the book named Unleashed was originally created after I received a cabochon with an unusual drusy void as a gift from Laura McCabe. As soon as I opened the box, I knew exactly what I wanted to do with it. It took some time, research and trial and error, but the result was exactly what I imagined.

Saw this image in an American Way inflight magazine article about the pinball museum in Seattle. I usually do my best work on airplanes.

Photo by Louis K. Meisel Gallery, Inc./ Corbis

Photo by Louis K. Meisel Gallery, Inc./ Corbis

Started sketching immediately.

Here is the result.

Spent a few hours in my eye doctor's office. I was sitting there for a very long time waiting for the doctor and looking at that machine they use to determine your prescription. Looked at this thing (whatever it is called) long enough and out came my sketchbook. I'm thinking spinning dials.

A bracelet called Take a Spin was created. This one took even more research and trial and error, but I love to play with the spinner on the bracelet.

Enter your email address to subscribe to the Extreme Bead Blog. Be sure to verify when you get the email.:

Delivered by FeedBurner

The Quest for Organization

Linda Landy

Organization is one of those things I aspire to but usually never achieve my expectations. It is a never ending effort.  One of my friends jokes that she beads, I organize. Here are a few thoughts about organization.

VIRTUAL ORGANIZATION

Along about the tenth time I unwittingly bought a tube of the same 8/0 metallic gold triangle beads, I realized that I needed a virtual organization system. Now, I have not gone completely crazy. There are certain beads that I use on a regular basis for bead embroidery. Triangles and hexes in 11/0 and 8/0 and 2.8mm and 3.4mm drops. I have a sortable list of my entire inventory of those beads on an Excel spreadsheet. It also includes the hybrid beads that I started buying while writing this book, and I’ve started to catalog my 15/0 beads. As I buy new ones, they go on the list.

When I went to the Bead&Button Show last year, I printed out a miniature version of the list and referred to it when shopping for beads. I also use it when shopping online. I have saved a ton of money on duplication. I wish I could say the same thing for my cylinder and round seeds. Someday I’ll have time to tackle the project.

PHYSICAL ORGANIZATION

For Mother’s Day one year, my gift to my mother was helping sort and organize her bead stash. I love my mother dearly, and she is a fabulous beader and stitcher. But, she had the most astonishing organization system you could imagine. Essentially, she shopped for beads and brought them home from the store or show in a bag. And there they stayed.

With the exception of our mutual love of beads (and my children and granddaughter), my mother and I are very different. My beads are organized in trays or boxes with neatly typed labels. Most have been transferred to the tic tac box system. They are sorted first by type of bead, next by size of bead and then by color.

I also create color “palettes.” For example, there’s a black palette—every size and shape bead I could find in black-- seed beads, accent beads, pearls, metals, you name it. The black palette occupies two boxes. There are three for silver and two for gold. There’s also some for primaries, peacock colors and turquoise. You get the picture.

But the great thing about it is when I decide that a project needs black. I just grab my black palette boxes and I don’t have to go searching though my stash.

Enter your email address to subscribe to the Extreme Bead Blog. Be sure to verify when you get the email.:

Delivered by FeedBurner

Random thoughts from someone who beaded too late last night

Linda Landy

  • If there is anything within 100 miles of your work surface, you will repeatedly catch your thread on it.
  • If it doesn’t work, abandon it or set it aside for a little while. More often than not, when you come back you’ll have a whole new perspective.
  • Regardless of the foundation or backing that you choose, make absolutely certain that it will not fray. I selected a woven fabric for the back of a collar that was just perfect. I didn’t want it to fray so I bonded it to a backing. It still frayed and made the finish work extremely difficult and less than perfect.
  • Always check to determine if your bead is colorfast.  Avoid finishes that will wear off as you work or when you wear your finished jewelry. I designed entire collar around fabulous 35mm matte gold bugle beads I bought in Canada when I first started beading. Halfway through the collar, the gold started wearing off, leaving a hideous yellow underneath. At first I tried to cover the chips with accent beads, but it became quickly apparent that I would ultimately end up with an ugly yellow bead. I had to cut it up and start over. The silver lining is that the exercise inspired my "extreme" technique for embellishment.
This picture shows the first sign of peeling.

This picture shows the first sign of peeling.

Here I have already embellished over the original yellow exposure and new spots have already appeared.

Here I have already embellished over the original yellow exposure and new spots have already appeared.

Enter your email address to subscribe to the Extreme Bead Blog. Be sure to verify when you get the email.:

Delivered by FeedBurner

The Pearl Drill

Linda Landy

Here is the next in a series of tips that were left out of Textured Bead Embroidery in the interest of space. I hope you enjoy them

Where the hole is drilled through a pearl makes a big difference in bead embroidery. The hole can be drilled in any direction. Typically, pearls are drilled from top to bottom, from side to side, or through the narrowest end at the top of the pearl. Here are some common pearl drilling terms:

  • Center-Drilled is right through the middle at the widest or longest part. Beads that are squared off, flattened, or oval, but are still drilled through the middle, are considered center-drilled. Even an odd-shaped bead, if it is drilled right through the middle, just where you'd expect, is considered center-drilled.

  • Side-Drilled or Cross Drilled are side-to-side across a shaped, non-spherical bead. This also applies to a bead with a definite front and back that is drilled from one side to the other across the width. In addition, irregularly shaped beads that are wider (side to side) than they are deep (front to back) and are drilled across their width are considered to be side-drilled.

  • Top Drilled pearls are designed to hang down like a pendant, drop or dangle when strung horizontally. In other words, the hole is drilled near the top of the bead.

Enter your email address to subscribe to the Extreme Bead Blog. Be sure to verify when you get the email.:

Delivered by FeedBurner

The "Cool Stuff" Rule

Linda Landy

Here is the next in a series of tips that were left out of Textured Bead Embroidery in the interest of space. I hope you enjoy them.

I took a class with Susan Lenart Kazmer when she was first starting to teach. I was in love with her amazing work with found objects. Unlike today, she didn’t have kits or sell objects. You had to work with what you brought from home. I didn’t have any “cool stuff” at home, and that made the class very frustrating.

From that moment on, I became a collector of “cool stuff.” If I saw something that inspired me I bought it and added it to my collection. I squirreled away bits and pieces of things I found around the house. I bought beads because I liked them, not just because I needed them for a specific project.

In 2012 I won first place in finished jewelry at the Bead&Button Show Bead Dreams competition with a piece I named Tilt! I wanted it to look like a pinball machine. The focal points were all repurposed, most from my cool stuff collection. The bumpers were created from slices of vintage billiard balls and antique sewing machine spools. The flippers were found in a tub at the Bead&Button Show. The plunger was a binder post scavenged from an old book and an unidentified spring found in my junk drawer. When my son’s constantly clacking Newton's Cradle toy mercifully tangled years ago, I salvaged the little chrome balls. (Don’t ask me why.) They have found a new home as "pinballs."

The moral of the story is if you have the space and the money, become a collector. You never know when that weird frog button will find the perfect home on a fabulous necklace.

TILT!

TILT!

Enter your email address to subscribe to the Extreme Bead Blog. Be sure to verify when you get the email.:

Delivered by FeedBurner

Bead "Auditions"

Linda Landy

Here is the next in a series of tips that were left out of Textured Bead Embroidery in the interest of space. I hope you enjoy them.

Seed beads are tricky little devils. Their color can change dramatically based on the light source, surrounding beads, thread, background, bead finish and other factors.

Although seed beads are irresistible hanging on pegs in fabulous hanks, I find row after row of bead tubes sorted by color mesmerizing. But, I have learned the hard way that what you see is not what you get. They look very different when removed from the comfort of their fellow beads and forced to stand on their own.

My mother always “auditions” her beads. No matter where she is (stores, my kitchen table, in a car…) she takes out her trusty beading needle and lines a half dozen or so right on the needle to get a more accurate idea of how they will look in a project. It is actually extremely effective if you don’t mind picking up beads wherever they may have scattered.


Enter your email address to subscribe to the Extreme Bead Blog. Be sure to verify when you get the email.:

Delivered by FeedBurner

Shopping Tips for Bead Embroidery

Linda Landy

Here is the next in a series of tips that were left out of Textured Bead Embroidery in the interest of space. I hope you enjoy them.

My initial attempts at shopping for beads were major disappointments a very important reasons: I did not know enough about beads to make intelligent choices and I did not have a plan.

After a 20 year hiatus from beading, I signed up for a class at the local community center in 2000, and the teacher took us on a field trip to a downtown jewelry supply store. Every possible inch of every wall, floor, counter and shelf was covered with strands, piles and bags of beads and findings. I was completely overwhelmed and after more than an hour walked out without making a purchase. Unfortunately, I no longer suffer from that condition.

After that ill-fated shopping trip I made a plan and turned to the Rio Grande catalog I borrowed from the teacher. That first purchase seemed outrageously expensive at the time, but the resulting projects launched me on my current path.

Shopping for beads is itself an art. Here are some tips on maximizing your experience: 

  • Go with a plan but be open-minded.

  • If you see something that speaks to you, buy it and make sure you purchase enough because you don’t know whether you’ll find it again.

  • If you find a bead shape that seems to work for you and your budget allows, buy it in a small selection of the colors you use most often. That way, you have a back-up stash to go to when the specific elements you chose for a piece fail to achieve the effect you envisioned.

  • Take advantage of internet sales and promotions to stock up on the things you use most often.

  • Maximize your purchasing power. The more you buy, the cheaper it is. Order as a group and take advantage of the savings.

  • Support your local bead store so it stays open. You never know when you need to pop in for an emergency tube of beads.


Enter your email address to subscribe to the Extreme Bead Blog. Be sure to verify when you get the email.:

Delivered by FeedBurner

Blending in Bead Embroidery

Linda Landy

Here is the next in a series of tips and techniques that were left out of Textured Bead Embroidery in the interest of space. I hope you enjoy them.

My very first Bead Dreams entry was inspired by a fabulous tree frog button and a heap of variegated and embellished daggers, lentils and ovals. I wanted the frog to sit on what looked like a grass vista at sunset – grass, then sunset peaking through the grass, then sunset, then blue sky. And, I wanted the grass to have texture and body. 

The  solution was a technique I call Sunset Glades -- rows of daggers supported by rows of ovals and lentils. The technique also encompasses color blending. The daggers lay beautifully instead of flopping around and the color and shape transition is seamless.

Sunset Glades

  1. Start at the bottom and backstitch a row of daggers in color one. To reinforce the beads, pass through the entire row again.

  2. Above that row backstitch a row of oval lentils in the same color tightly against row one. Pass through the entire row again. The ovals disappear into the background, but they support the daggers and added dimension.

  3. Repeat that pattern (tightly stitched rows of daggers then ovals) until you want to introduce the next color.

  4. To transition into the next color intersperse a few randomly placed color two daggers and ovals among the rows of color one beads. With each subsequent row increase the number of color two beads in random areas (obviously decreasing the number of color one beads) until there are only color two beads.  This is a classic method for blending colors as you transition from one to another.

  5. Repeat until you want to introduce the next color.

  6. To taper off the design, replace a few randomly placed daggers with lentils. With each subsequent row increase the number of smaller beads (obviously decreasing the number of color one beads) until there are only small beads.

SPLENDOR IN THE GRASS

SPLENDOR IN THE GRASS

Enter your email address to subscribe to the Extreme Bead Blog. Be sure to verify when you get the email.:

Delivered by FeedBurner

OMG, where did this loop come from?

Linda Landy

Here is the next in a series of tips that were left out of Textured Bead Embroidery in the interest of space. I hope you enjoy them.

It is inevitable that one day you will turn over your beadwork and discover that your thread got caught on something (the edge of your foundation, a knot, a bead…) and there is a giant loop of thread back there. It can also happen if you get a knot in your thread. There’s an easy fix. Release the loop and cut it at the middle. Tie a square knot (with an extra knot if it is Fireline) flush with the foundation and trim off the excess. Problem solved.

Enter your email address to subscribe to the Extreme Bead Blog. Be sure to verify when you get the email.:

Delivered by FeedBurner

There’s a hole in my foundation!

Linda Landy

Here is the first in a series of tips that were left out of Textured Bead Embroidery in the interest of space. I hope you enjoy them.

I learned the hard way that if you rip out your beads too many times in the same location it is very easy to wear a hole in the foundation. To repair the hole:

Cut a piece of beading foundation large enough to extend beyond the hole approximately a quarter inch on each side.

  1. Apply a small amount of E6000 to the edges of the hole on the back of the project.

  2. Attach the patch to the back and let it dry.

  3. Embroider as usual making sure to stitch into the edges of the patch. The foundation may be a little harder to work with because the glue stiffens the foundation. The patch is reinforced as you stitch over the edges in the process of adding new beads.

Enter your email address to subscribe to the Extreme Bead Blog. Be sure to verify when you get the email.:

Delivered by FeedBurner

Hook Line and Sinker

Linda Landy

While wandering through the Gathering Place at the Bead&Button show I met Ralonda Patterson who was stitching art dolls. Then I noticed these amazing fish she had designed. I was hooked. I rarely buy kits but I just had to have one. Talk about texture, I loved the little dagger fins and tails. She captured fish scales with her beads and sculpted the fish by varying the size of her beads. Check out Ralonda's Blog.

Enter your email address to subscribe to the Extreme Bead Blog. Be sure to verify when you get the email.:

Delivered by FeedBurner

A real eye opener

Linda Landy

Just wanted to share this wonderful bracelet made by my friend  Kasey Mazzara. She took bead embroidery to the next level by creating a three dimensional element using free form peyote stitch. Notice the wonderful flow of the beads. It is completely free form, but she has used color and weight to balance the bracelet. Kasey says the bracelet just evolved. I've often said to listen to the beads. They know where to go. Thank you Kasey for sharing your creation.

Bead Embroidered bracelet by Kasey Mazzara

Bead Embroidered bracelet by Kasey Mazzara

Enter your email address to subscribe to the Extreme Bead Blog. Be sure to verify when you get the email.:

Delivered by FeedBurner